Building real-time data lakes with Apache Flink and Apache Paimon
A hands-on guide to streaming CDC into an Apache Paimon lakehouse with Flink SQL - including changelog semantics, compaction, and query patterns.
· #flink #paimon #data-engineering
Published October 25, 2024

Hey #DataEngineers! 👋 Today, I'm excited to share my experience building a real-time data lake pipeline using Apache Flink and Apache Paimon. If you want to modernize your data infrastructure, this guide is for you!
What We'll Build 🔨
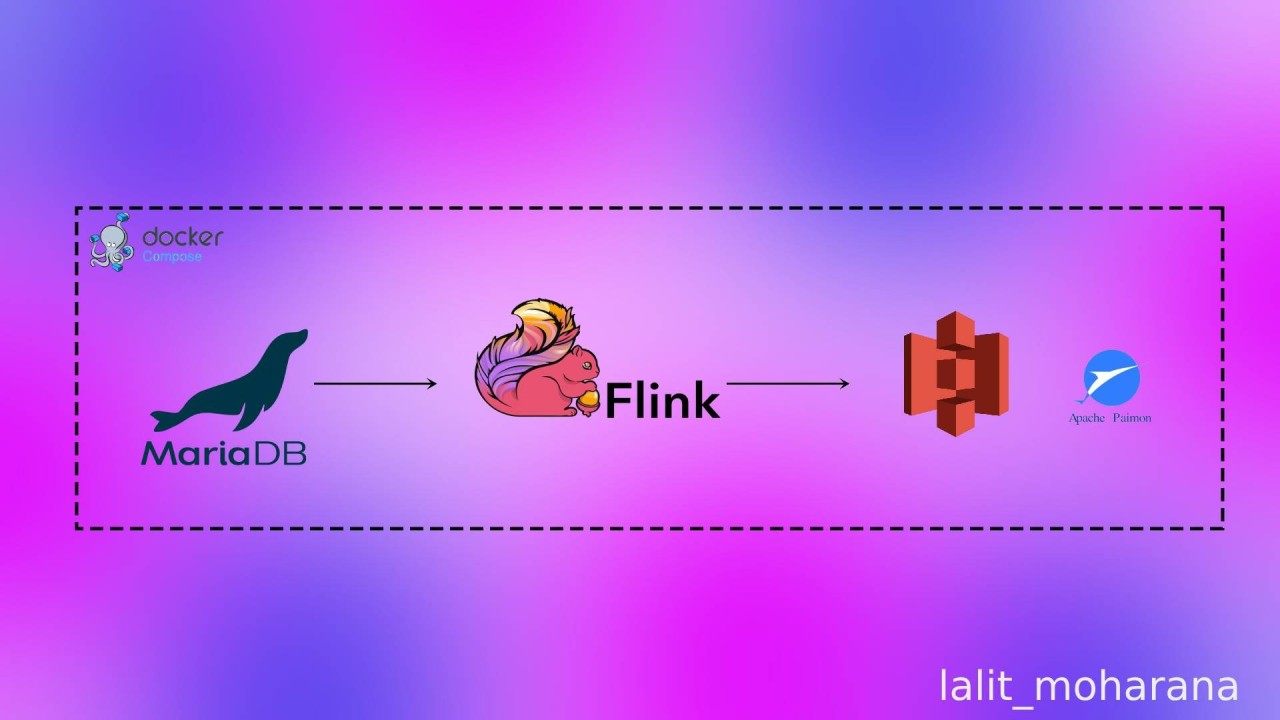
We'll create a complete data pipeline that:
Captures real-time changes from a MySQL database using CDC (Change Data Capture)Processes the data using Apache FlinkStores it in a data lake on Amazon S3 using Apache PaimonAll running in Docker containers! 🐳
First, Let's Talk About Apache Paimon 📊
Before we dive into the code, let's understand why Apache Paimon is generating buzz in the data engineering world.
What is Apache Paimon?
Apache Paimon (incubating) is a streaming data lake platform that provides:
Real-time data ingestionStreaming updatesACID transactionsSchema evolutionTime travel capabilities
Why Choose Paimon?
Streaming First : Unlike traditional data lakes, Paimon is built for streaming data from the ground up.High Performance : Optimized file layout and intelligent indexing for fast queries.Simplified Architecture : No need for separate streaming and batch pipelines.Cost-Effective : Efficient storage format reduces S3 costs.Advanced Features : Time travel, schema evolution, and ACID transactions out of the box.
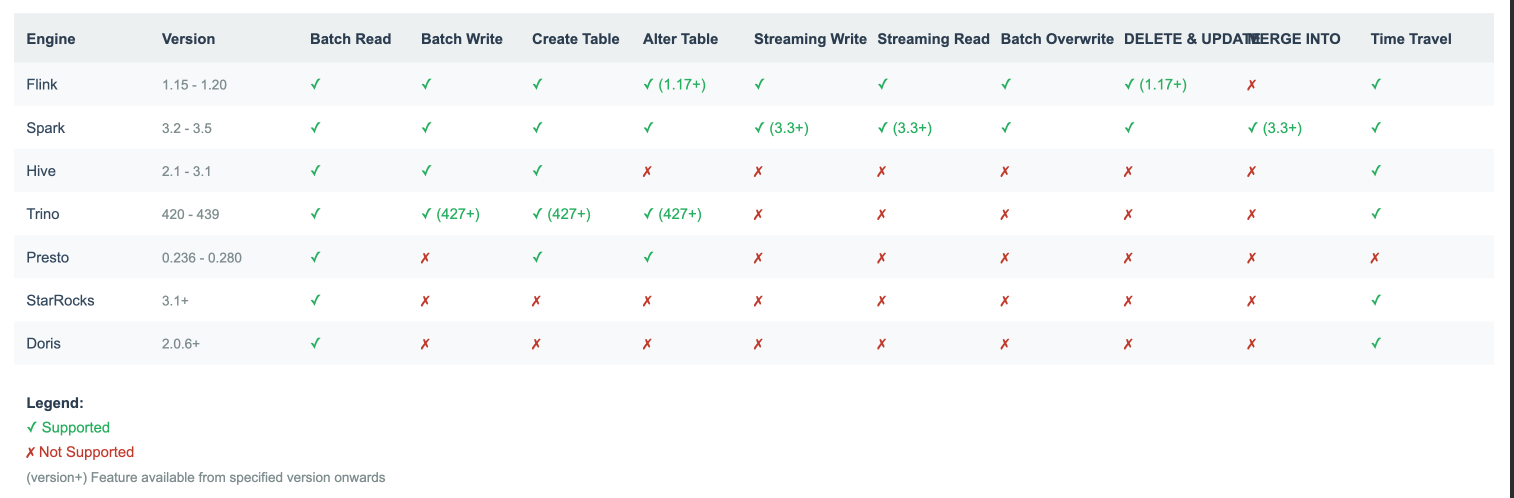
Supported engines
Prerequisites 📝
Docker and Docker Compose installedAWS account with S3 accessBasic understanding of SQLCoffee ☕ (optional but recommended!)
Step 1: Setting Up AWS S3 🪣
Log into your AWS ConsoleNavigate to S3 and create a new bucket:
Bucket name: paimon-test-bkt
Region: us-west-2 (or your preferred region)
Keep default settings for other options
Create an IAM user with S3 access:
Go to IAM → Users → Add user Name: paimon-flink-user Attach policy: AmazonS3FullAccess Save the Access Key and Secret Key
Step 2: Project Structure 📁
Let's organize our project. Create the following directory structure:
flink_paimon/
├── jar1/
│   ├── bundle-2.28.29.jar
│   ├── flink-connector-jdbc-3.1.0-1.17.jar
│   ├── flink-s3-fs-hadoop-1.19.1.jar
│   ├── flink-shaded-hadoop-2-uber-2.8.3-10.0.jar
│   ├── flink-sql-connector-mysql-cdc-2.4.1.jar
│   ├── hadoop-aws-3.4.1.jar
│   └── paimon-flink-1.18-0.7.jar
├── postgres-init/
│   ├── init.sql
│   └── mariadb.cnf
├── job/
│   └── job.sql
└── docker-compose.yml
Step 3: Setting Up the Database 💾
Create postgres-init/init.sql:
CREATE DATABASE IF NOT EXISTS metastore;

use metastore;

CREATE TABLE IF NOT EXISTS users (
    id SERIAL PRIMARY KEY,
    name VARCHAR(100),
    email VARCHAR(100),
    created_at TIMESTAMP DEFAULT CURRENT_TIMESTAMP
);

INSERT INTO users (name, email) VALUES
    ('John Doe', 'john@example.com'),
    ('Jane Smith', 'jane@example.com'),
    ('Bob Johnson', 'bob@example.com');
Step 4: Docker Compose Configuration 🐳
Your docker-compose.yml orchestrates three services:
MariaDB for source dataFlink JobManagerFlink TaskManager(s)
version: '3.7'

services:
  mariadb:
    image: mariadb:10.6.14
    environment:
      MYSQL_ROOT_PASSWORD: rootpassword
    volumes:
      - ./postgres-init/mariadb.cnf:/etc/mysql/mariadb.conf.d/mariadb.cnf
      - ./postgres-init/init.sql:/docker-entrypoint-initdb.d/init.sql
    ports:
      - "3306:3306"
    networks:
      - paimon-net

  jobmanager:
    image: flink:1.18.0
    container_name: jobmanager
    environment:
      - JOB_MANAGER_RPC_ADDRESS=jobmanager
      - AWS_ACCESS_KEY_ID=<access key>
      - AWS_SECRET_ACCESS_KEY=<secret_key>
    ports:
      - "8081:8081"
    command: jobmanager
    volumes:
      - ./jar1/flink-sql-connector-mysql-cdc-2.4.1.jar:/opt/flink/lib/flink-sql-connector-mysql-cdc-2.4.1.jar
      - ./jar1/flink-connector-jdbc-3.1.0-1.17.jar:/opt/flink/lib/flink-connector-jdbc-3.1.0-1.17.jar
      - ./jar1/flink-shaded-hadoop-2-uber-2.8.3-10.0.jar:/opt/flink/lib/flink-shaded-hadoop-2-uber-2.8.3-10.0.jar

      - ./jar1/paimon-flink-1.18-0.7-20240101.002256-41.jar:/opt/flink/lib/paimon-flink-1.18-0.7-20240101.002256-41.jar
      - ./jar1/flink-s3-fs-hadoop-1.19.1.jar:/opt/flink/lib/flink-s3-fs-hadoop-1.19.1.jar
      - ./jar1/hadoop-aws-3.4.1.jar:/opt/flink/lib/hadoop-aws-3.4.1.jar
      - ./jar1/bundle-2.28.29.jar:/opt/flink/lib/bundle-2.28.29.jar
      - ./job/:/opt/flink/job
      - ./logs/flink/:/opt/flink/temp
    networks:
      - paimon-net
  taskmanager:
    image: flink:1.18.0
    environment:
      - JOB_MANAGER_RPC_ADDRESS=jobmanager
      - AWS_ACCESS_KEY_ID=<access key>
      - AWS_SECRET_ACCESS_KEY=<secret_key>

    depends_on:
      - jobmanager
    command: taskmanager
    volumes:
      - ./jar1/flink-sql-connector-mysql-cdc-2.4.1.jar:/opt/flink/lib/flink-sql-connector-mysql-cdc-2.4.1.jar
      - ./jar1/flink-connector-jdbc-3.1.0-1.17.jar:/opt/flink/lib/flink-connector-jdbc-3.1.0-1.17.jar
      - ./jar1/flink-shaded-hadoop-2-uber-2.8.3-10.0.jar:/opt/flink/lib/flink-shaded-hadoop-2-uber-2.8.3-10.0.jar

      - ./jar1/paimon-flink-1.18-0.7-20240101.002256-41.jar:/opt/flink/lib/paimon-flink-1.18-0.7-20240101.002256-41.jar
      - ./jar1/flink-s3-fs-hadoop-1.19.1.jar:/opt/flink/lib/flink-s3-fs-hadoop-1.19.1.jar
      - ./jar1/hadoop-aws-3.4.1.jar:/opt/flink/lib/hadoop-aws-3.4.1.jar
      - ./jar1/bundle-2.28.29.jar:/opt/flink/lib/bundle-2.28.29.jar
    deploy:
      replicas: 2

    networks:
      - paimon-net

networks:
  paimon-net:
    driver: bridge
💡 Pro Tip: Using volumes ensures your Flink jobs have access to all required dependencies.
Step 5: The Flink SQL Job 📝
Create job/job.sql:
USE CATALOG default_catalog;

DROP CATALOG IF EXISTS s3_catalog;

CREATE CATALOG s3_catalog WITH (
    'type' = 'paimon',
    'warehouse' = 's3://paimon-test-bkt/',
    's3.endpoint' = 'https://s3.us-west-2.amazonaws.com',
    's3.access-key' = <access key>,
    's3.secret-key' = <secret_key>

);

USE CATALOG s3_catalog;

CREATE DATABASE IF NOT EXISTS my_database;

USE my_database;

CREATE TABLE IF NOT EXISTS user_paimon (
        id INT,
        name STRING,
        email STRING,
        created_at TIMESTAMP(3),
        PRIMARY KEY (id) NOT ENFORCED
);

create temporary table users (
        id INT,
        name STRING,
        email STRING,
        created_at TIMESTAMP(3),
        PRIMARY KEY (id) NOT ENFORCED
) WITH (
    'connector' = 'mysql-cdc',
    'connection.pool.size' = '10',
    'hostname' = 'mariadb',
    'port' = '3306',
    'username' = 'root',
    'password' = 'rootpassword',
    'database-name' = 'metastore',
    'table-name' = 'users'
);

SET 'execution.checkpointing.interval' = '10 s';

INSERT INTO user_paimon (id,name) SELECT id, name FROM users;
Let's break down what this job does:
Creates a Paimon catalog pointing to S3Sets up a database and table structureCreates a CDC source reading from MariaDBContinuously streams data changes to Paimon
Step 6: Managing AWS Credentials 🔐
After creating your IAM user, you'll need to configure credentials in several places. Let's do this securely!
In docker-compose.yml
Replace these placeholders in the jobmanager and taskmanager services:
environment:
  - AWS_ACCESS_KEY_ID=<aws accid>      # Replace with your actual AWS Access Key ID
  - AWS_SECRET_ACCESS_KEY=<secret key>  # Replace with your actual AWS Secret Access Key
For example:
environment:
  - AWS_ACCESS_KEY_ID=AKIAIOSFODNN7EXJMPLE
  - AWS_SECRET_ACCESS_KEY=wJalrXUnnFEMI/K7MDENG/bPxRfiCYEXAMPLEKEY
In job.sql
Update the S3 catalog creation with your credentials:
CREATE CATALOG s3_catalog WITH (
    'type' = 'paimon',
    'warehouse' = 's3://paimon-test-bkt/',
    's3.endpoint' = 'https://s3.us-west-2.amazonaws.com',
    's3.access-key' = 'AKIAIOSFODNN7EXJMPLE',     # Your AWS Access Key ID
    's3.secret-key' = 'wJalrXUnnFEMI/K7MDENG/bPxRfiCYEXAMPLEKEY'  # Your AWS Secret Access Key
);
Step 7: Running the Pipeline 🚀
Start the containers:
docker-compose up -d
Execute the Flink SQL job:
docker exec -it jobmanager /opt/flink/bin/sql-client.sh embedded -f /opt/flink/job/job.sql
Monitor your job at http://localhost:8081 🎉
Common Issues & Solutions 🔧
Connection Refused : Make sure MariaDB is fully initialized before starting the Flink job.Missing Dependencies : Verify all JARs are correctly mounted in the Flink containers.S3 Access Denied : Double-check your AWS credentials and bucket permissions.
Performance Tuning Tips 🔥
Adjust checkpoint interval based on your data volume:
SET 'execution.checkpointing.interval' = '10 s';
Configure appropriate parallelism:
SET 'parallelism.default' = '4';
Optimize Paimon file size:
SET 'table.exec.sink.batch-size' = '128';
Monitoring & Maintenance 📊
Use Flink's Web UI to monitor: Job status Checkpointing Task manager metricsWatch S3 storage costs: Monitor file sizes Set up lifecycle policies Configure compression
What's Next? 🚀
Add data transformationsImplement schema evolutionSet up streaming analyticsAdd real-time dashboards
Conclusion 🎯
Apache Flink and Paimon provide a powerful combination for building modern data lakes. This setup gives you:
Real-time data processingReliable StorageACID guaranteesFuture-proof architecture
What are your thoughts on Apache Paimon? Have you tried it in production? Let's discuss this in the comments!
#ApacheFlink #ApachePaimon #DataEngineering #BigData #RealTime #DataLake #AWS
#StreamingIngestion #Lakehouse #ApacheFlink #ApachePaimon #ApacheIceberg #SparkSQL #RealTimeProcessing #StreamingLakehouse #